Autoclave Service
Locations: 3159 MRB3, 4159 MRB3, and CC-2302 MCN
$5.50/Run*
*Rate of $5.50/Run is effective as of September 29, 2016.
This page provides you with information on using CDB autoclaves, determining how long to sterilize, a background on sterilization equipment, and best practices.
*Note: You are REQUIRED TO USE a secondary container when autoclaving liquids in CDB autoclaves. If bottles of media were to break without secondary containers, then media would burn onto the autoclave surface and drip into the drain potentially causing it to clog. Clogged drains are a frequent problem in the medical center autoclaves. They are an expensive and completely PREVENTABLE repair.
Biohazard Waste
- Never autoclave biohazard waste in CDB autoclaves!
- The Environmental Services crew will pick up this waste each night as they come through your lab to clean.
- There have been several instances where bags have melted to the walls of the autoclave or they have been placed directly on the racks and melted.
- What do I need to do to get it picked up?
- Contact the CDB Equipment Core Manager
How long do I sterilize?
The CDC has guidelines for sterilization at this link.
Below you will find a table which Steris uses as a roadmap for assuming a high degree of sterility assurance in your autoclave runs. Please understand that these are only guidelines and are in terms of “time” as a function of how much “volume per flask”. The minimum sterilization time, however, can vary significantly due to how many flasks you are sterilizing, how you place the flasks in the autoclave, and what type of liquid you are sterilization. For example, the times below are for “water-like” solutions. It is possible that the sterilization time of media should be slightly shorter so it is not overcooked. Other examples might include when someone stacks flasks on top of each other or overloads the autoclave. The sterilization time might need to lengthen in these cases. Finally, adding water to the bottom of your secondary containers can help to transfer heat evenly to your bottles or flasks.

“Verify Test Strips” Liquid Sterilization Results
Even with consistent preventative maintenance, sterilization between machines can vary. Steris offers “Verify Integrator Strips” to assess the degree of liquid sterilization. Although these strips cannot guarantee sterilization of media under all users conditions, they provide an additional indication that the instrument is functioning properly. The test strips have a yellow indicator strip which turns dark tan only if the following conditions occur in the autoclave: appropriate steam, hitting sterilization temperature for minimum of 12 minutes, and a proper pressure. As you can see from November 2013 tests below, instruments can vary (top strip is negative control). 
Overview of Sterilization
This is an excellent overview of autoclave operation posted by Dr. Howard Judelson at UC Riverside. The specifics of their machines are different than ours, so ignore the instructions at the end.
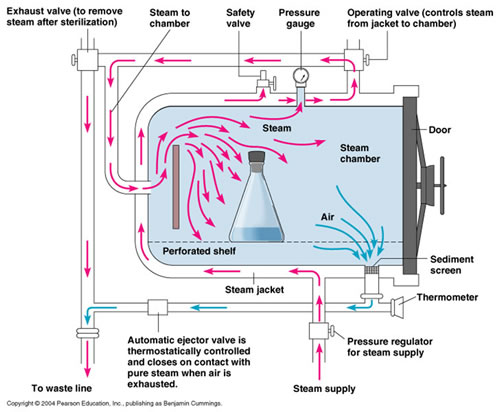
Our autoclaves are downward displacement models. They work by forcing steam in at the side or back of the chamber which displaces the air downwards and out through a grated drain. There is turbulence inside the chamber (the steam comes in at about 25 p.s.i.) but solid walled trays can create a tub of air which prevents steam from contacting the entire surface area of the bottles. This means they are not exchanging heat properly and the media may not reach sterilizing temperatures.
Trays with holes would do a better job of reaching sterilizing temperature (Gillespie & Gibbons, 1975), but do not protect against glass breakage. Solid secondary containers help with user safety and keep the machines in good working order. About a quarter of autoclave trouble calls are due to clogged drains according to the SER shop, sometimes because of agar media, sometimes because of melted trays, sometimes just built up detritus. So, secondary containers keep the machines running well by preventing clogs and removing one container with 16 flasks is much safer than directly handling these bottles of hot, scalding fluids individually. Also, in the very unlikely event that the flasks explode, the walls of the tray provide you with some shielding. In the end, your safety is much more important than the sterility of your media so I encourage use of trays.
Recommended Best Practices
Below is what I consider an “aspirational” list of safety precautions. For example, rarely does one see an autoclave user wearing a rubber apron. However, these safety tips point to the very real dangers that high temperature liquids pose to users and great caution should always be exercised while unloading an autoclave.
- Before using the autoclave, check inside the autoclave for any items left by the previous user that could pose a hazard (e.g. sharps).
- Clean the drain strainer before loading the autoclave.
- Load the autoclave properly as per the manufacturer’s recommendations (do not heap).
- To prevent bottles from shattering during pressurization, the caps of containers with liquids must be loosened before loading.
- You are REQUIRED TO USE a POLYPROPYLENE (PP) secondary container with a solid bottom and walls to contain the contents and catch spills.
- Add 1/4 to 1/2 inch of water to the tray so the bottles will heat evenly during liquid cycles.
- Check plastic materials to ensure they are compatible with the autoclave (no LDPE marked items).
- Individual glassware pieces should be within a heat resistant plastic tray on a shelf or rack and never placed directly on the autoclave bottom or floor.
- Make sure the door of the autoclave is fully closed (latched) and the correct cycle has been selected before starting the cycle (temperature should be 121°C).
- Wear heat-resistant gloves when opening the autoclave door after a cycle. If there is a sharps hazard (e.g. biological waste), wear heat AND cut resistant gloves.
- Before removing autoclaved items, wait 5 minutes for loads containing only dry glassware, and 10 minutes for autoclaved liquid loads.
- At a minimum, when removing items from an autoclave, a rubber apron, rubber sleeve protectors and heat-resistant gloves should be worn.
- For non-liquid loads, let the glassware cool for 15 minutes before touching it with bare hands.
- For liquid loads, let liquids stand for a full hour before touching with ungloved hands. Be sure others in the area know a heat hazard is present.
For the autoclave enthusiasts, you can download the exhaustive user manual below.